
Making your photographs Internet-ready
Digital cameras now typically create images with ten million pixels or more. Learn how to reduce them to smaller dimensions and choose appropriate compression settings so they’ll transfer faster.
Here’s a scenario. A few years ago, a young friend went to live in Johannesburg. Acquiring an Internet connection and a digital camera, she started to send photographs of her new life abroad to her mum and to me, as attachments to email. Those photos contained several million pixels each, and they took a lo-o-o-o-ng time to download…
Here’s another scenario. Somebody is building a Web site, using Dreamweaver software. He wants to add a photo to the page, but when he imports it, he finds it is too large. No problem: Dreamweaver lets you grab a corner and resize the picture. But what our webmaster doesn’t realise is that all Dreamweaver is doing is mucking about with the <img> tag attributes for width and height. The Web page previews pretty quickly on the designer’s screen because it is loading from his hard disk. But when the site goes live, anyone who hits that page over a slow Internet connection has to wait a minute while the large photo file slowly pours into the small space reserved for it on screen.
Both these people need to learn how to reduce the number of pixels in their photos, and choose an appropriate JPEG compression setting, so they are optimised for Internet transfer and Web use.
Reducing the pixel count

Even a compact camera like this Canon G11 generates ten-megapixel images. (I’m told Canon reduced the pixel resolution from the previous model, because having fewer but larger light sensors improves photon capture, for better quality images in low light.)
In the last few years, manufacturers of digital cameras have been competing with each other to offer us machines that can generate several millions of pixels. Ten or twelve ‘megapixels’ is now quite common for a compact digicam, and my Nikon D200 digital single-lens camera generates an eighteen megapixel file (3886 pixels wide, 2660 pixels high). Even some mobile phones have cameras that create quite hefty files.
These high resolutions are great if you want to make large prints from your digital photos, but for display on screen they are excessive. In any case, quite often the picture will be improved if you crop in closer to the subject. You get a double benefit: a better-composed shot, and a reduced pixel count.
Even so, your photo may be too large for Internet transmission or for use in a presentation, so your next step is to ‘subsample’ the image, mapping the image contents to a mesh composed of fewer pixels.
To crop the image and to subsample it, you need image editing software. For the sake of this explanation I will assume Adobe Photoshop is the tool you’ll use, but it is quite expensive software, so towards the end of this article I’ll explore some low-cost or free alternatives which do the same job.
A fine crop
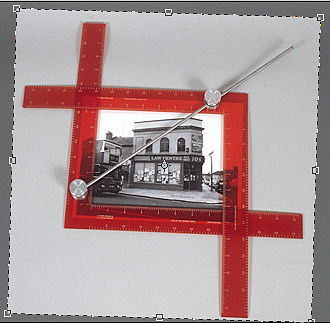
This photograph of a Brandt Scaleograph — an American graphic arts studio tool, on which the icon for the Crop tool in Photoshop is based — is itself being cropped and straightened up in Photoshop.
In Photoshop, cropping is best achieved with the Crop tool. You draw a rectangle with the tool over the image to indicate the part you want to keep, and you get a chance to adjust the edges of the cropping selection before you press the Enter or Return key to complete the process.
If you position the cursor just outside the cropping area and by one of the corners, you can also rotate the cropping selection: a good opportunity to straighten up some wonky shooting!
Incidentally, very few people except American graphic designers of a certain age are aware that the icon which represents the Crop tool is based on the Brandt Scaleograph… A limited number of these were imported to Britain and I used to have one, as shown here. The lockable knobs allowed you to lock the device to a specific aspect ratio, then experiment with various croppings by sliding the upper L-shape along the steel bar, while viewing the composition of the photo through the aperture formed by the orange frame.
Interpolate and sharpen
Photoshop’s Image Size dialogue box (accessed from the Image menu) is where we decimate the pixels. In the bottom left of the dialogue box, make sure that Constrain Proportions and Resample Image are turned on. As for the pop-up menu which gives a choice of resampling methods, choose one of the Bicubic Interpolation options. (‘Interpolation’ is basically a technique for inventing a new set of pixels — fewer pixels, if we are reducing the size — and distributing the existing image values across them.)

Using the Image Size dialogue to subsample a photograph from a Nikon D200 to 700 pixels wide. Note the dramatic reduction in file size: from 28.7 megabytes to 961k, even before file compression is applied.
Unless you are preparing an image for a print-based project, I wouldn’t worry about the three Document Size settings. Focus on the Pixel Dimensions section at the top, and type in a new number of pixels for either the width or the height. For example, if I am uploading an image to a Facebook album I usually resample a ‘landscape’ oriented image to about 800 pixels wide.
Subsampling an image tends to make it a little bit softer, fuzzier. I remedy that by using a sharpening filter, and I recommend Filter > Sharpen > Smart Sharpen… — this brings up a dialogue box with a preview window where you can vary the degree of the sharpening effect and the radius over which it operates. Don’t overdo it or you’ll produce some nasty artefacts around the edges of objects. I suggest you start with the sharpening amount set to about 50% and the radius to 0.7 of a pixel.
Applying JPEG compression
JPEG stands for ‘Joint Photographic Experts Group’ and is the name of a committee of experts assembled by the International Standards Organization and the International Telecommunications Union. These people were given the task of coming up with an effective way of compressing digitised photographic images, initially as I understand it so that press photographers in the field could send pictures back to their newspapers, for example using a dial-up link from a laptop in a hotel bedroom.

This photo (650 x 526 pixels) was reduced to 81.3 KB once moderate JPEG compression was applied.
I have artificially forced the image to display here at quarter size, 325 x 263 pixels, by mucking about with the HTML page code, but if you click on the picture you’ll see it at its original size.
The JPEG committee’s brief required them to come up with a compression method which could be implemented on a basic laptop (therefore, not too computationally demanding), and achieve a small file size. The solution they came up with, a method called Discrete Cosine Transform, fits the bill but is ‘lossy’ — that is, quality is lost in the process, quality which can never be recovered. The good news is that this step in the compression process can be modified by a Quality setting: you can choose to preserve pretty high quality and achieve modest compression, or sacrifice quality to create a much smaller file.
In Photoshop, the best way to apply JPEG compression is to save the file through the ‘Save For Web and Devices’ system, where you can drag a slider to apply varying degrees of compression and you get a live preview of the effect this will have on the quality of the image.
By way of example, see the photo of Lincoln Cathedral which I took in September 2009. To send this as an email attachment ‘postcard’ to friends, I cropped and resampled it to 650 x 526 pixels, and then applied enough JPEG compression (ratio 1:12) to get the file size down to 81.3 KB. To fit this Web page format I’ve ‘trapped’ the image into a quarter-size Web image frame, but if you click on the photo you’ll see the image exactly as I sent it to friends.
In-camera image compression
JPEG compression was invented before there were digital cameras; back then it was assumed that photographers would develop their film and scan the slides or negatives on a portable slide scanner such as the Nikon Coolscan. When digital photography really took off in the late 1990s, the camera manufacturers adopted JPEG as the standard file format, to pack more digital photos onto a memory card.
The camera interface usually gives you a choice of three levels of JPEG compression, delivering High, Medium or Low quality. So I suppose if you don’t have access to any computer software for subsampling your photographs, you could get the camera to save in Low quality JPEG for maximum compression — but I do think that would be a shame to throw away quality right at the start!
Digital cameras which are aimed at the more professional user also use JPEG compression for the files they save, but additionally offer file save options which are not compressed, either as TIFF, or increasingly as ‘raw’ files which capture a wider dynamic range; and these files can be pretty big. My Nikon D200, for example, stores .NEF raw files which are 15.4 megabytes each, and which when opened into Photoshop expand to 28.7 megabytes.
(If you are interested to read in more detail about ‘raw format’ photography you can download my briefing paper on the subject.)
Alternatives to Photoshop?
Please note: I have not had the opportunity to test all of these alternatives and discover their limitations, if any. I would welcome hearing from people who have tried these tools out: write to me at conradtaylorbcs {at} googlemail.com and I can add your comments to this page.
- Serif PhotoPlus X4: This made-in-Nottingham commercial alternative to Photoshop for Microsoft Windows costs £69.99 and runs fine on Windows XP. It can also work with ‘raw’ files.
- The GIMP: the GNU Image Manipulation Program is a free-of-charge Open Source project. The GIMP is developed on a Unix X11 platform but is also quite easy to install for Windows if you use the GIMP for Windows Installer created by Jernej Simončič. I have installed this on a friend’s Windows machine and can confirm that it can crop and resample images; in fact, that’s why she wanted it installed. There is a Mac version of GIMP but as it isn’t a native Mac app, requires X11 and is a pig to install, I don’t recommend it.
- Seashore: This is an open-source image editor for Mac OS X (10.4 and above), downloadable free of charge. Seashore is based around a subset of the features in the GIMP. To quote the project’s Web page, ‘Unlike the GIMP, Seashore aims to serve the basic image editing needs of most computer users, not to provide a replacement for professional image editing products. Also, unlike GIMP, Seashore has an all-new Cocoa UI that will fit right in on Mac OS X.’
- Fotografix 1.4.1: is a lightweight free-of-charge image editor for Windows, aimed at the basic needs of Web developers, etc. I have done a basic evaluation of this on a friend’s PC, and it does provide the functions we need to crop and subsample images. Links to an installer for this have been hard to track down but you could try this download page hosted at Softfive.